Being able to run lead generation Ad on Facebook is one of the many tricks of being a digital marketer. The process is quite simple and there would be no need for a website. The leads will save on the page from which the ad was ran and you can export later.
Step One: Choose Ad account and create Audience
To run this Ad, the first step is in choosing the appropriate ad account through your business manager here. Once that has been done, You can create a new audience using audience insights. Click here to learn how to use the tool.
After saving your audience, you are now one step closer to running a lead generation ad on Facebook.
Step Two: Choose campaign Objective
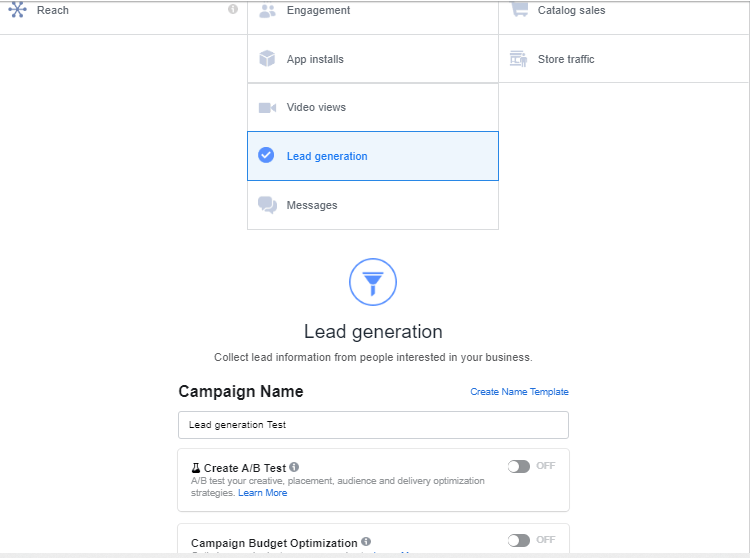
From your ads manager, click on the ‘create’ button. After doing that, choose ‘lead generation’ as the campaign objective.
A/B split test should only be turned on if you are trying to create a split test. If it is just one campaign, then there is no need. Campaign budget optimisation is needed when you are creating a campaign with more than one Ad set, and need your budget to focus on the ad set which is bringing the best results.
Also, give your campaign a name
READ ALSO: Effective Facebook Ads Creation: Traffic Campaign Objective
Step Three: Ad set Level
At this stage of your lead generation ad on Facebook, you are to carry out the necessary Ad set level settings which include;
- Page
- Audience
- Placement
- Budget
- Start and end date
First, you have to click on the terms and agreements, after which you must accept for the Ad to run.
Step Four: Ad Level
On the Ad level, you are to add the following;
- Creatives format and image(s) or video(s)
- Ad copy or primary text
- Headline
- Description
Step Five: Choose a Format
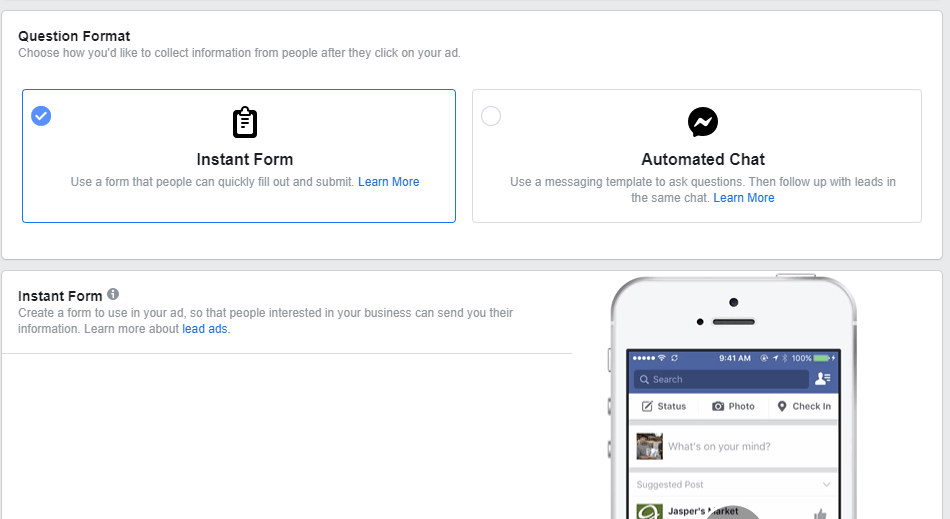
Now you are ready to create your lead capture form. To begin, you must choose between an ‘instant form’ which allows you capture leads directly, or an ‘automated chat’ which allows you create an automated message template. The chat can then be used to gauge the level of interest from each person after which you can follow each individual up.
Step Six: Create Form
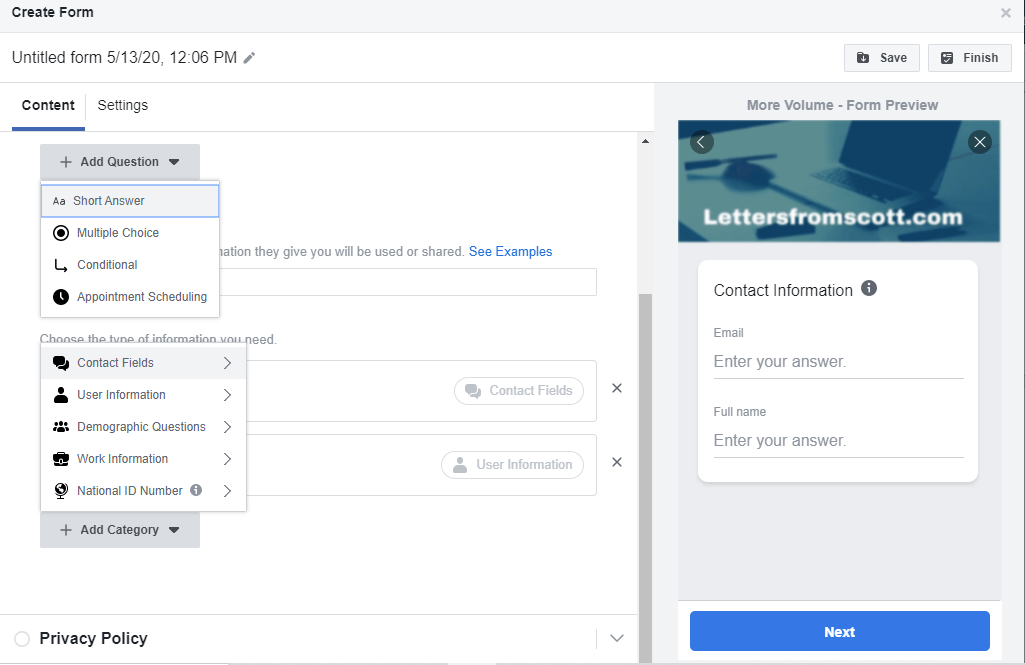
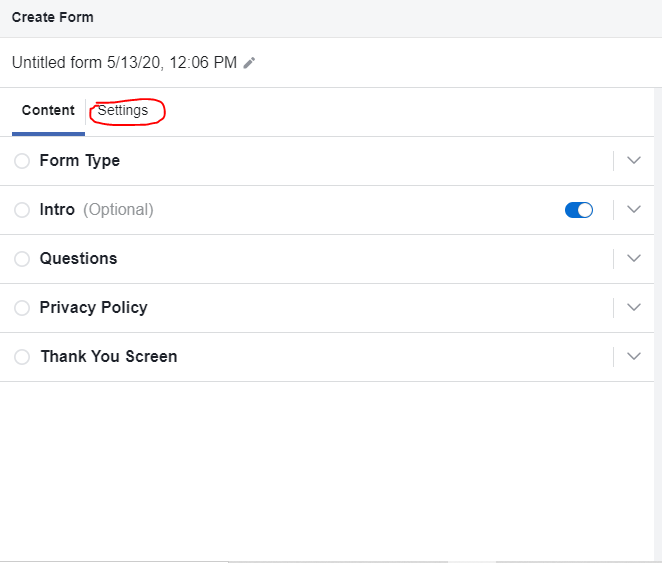
Click on ‘new form’, then proceed to create the necessary fields. Keep in mind that Facebook would only permit you to collect generic information such as name and email, not personal details like Facebook username.
- Form Type: More volume type of form is much quicker to fill and is ideal for an audience that is not patient enough to review the information they fill. Higher Intent takes a little more time to be filled, seeing as the person has to review the information before submitting the form.
- Intro: This field allows you to briefly explain what they stand to gain. You can add a headline, upload an image and add a text layout, which explains your intention for the Ad and can either be in paragraph format or bullet points.
- Questions: Here, the magic happens. You get to decide what information you require from your prospects and there is a plethora to choose from. What is required is that you diligently go through the options, then choose which best suits your objectives based on your customer avatar.
- Privacy Policy: Due to the fact that you would be collecting user data, Facebook would require that you add your company’s privacy policy both in text and in URL. You can also add a customer disclaimer.
- Thank You Screen: You can go ahead to add an automated than you message which your prospects would see after filling the form. Even better is that you can add a CTA and the link to your website or a particular web page which they would be able to click on after submitting the form.
Step Seven: Other Settings
- Form Configuration : You are to set a preferred language for your form, after which you can restrict the form submission to only those in your targeted audience, or allow everyone to be able to fill and submit the form.
- Field IDs: This allows you to configure the name and email formats
- Tracking Parameters: Allows you generate and embed a tracking code on your lead generation ad on Facebook
After creating the form, click on ‘finish’ to the top right corner, then scroll down and confirm the Ad. Once this has been done, your lead generation ad is ready to go live and fetch the desired results.
How to Find Your Leads
After the ad has been published, the next step is to know how you can find the leads that has been generated and export them in the required format, this is easy.
Step One: Choose the Page
While creating the Ad, you must have selected a particular Facebook page to enable the Ad run. You have to fetch that page through your business manager or Facebook profile.
Next, click on the ‘more’ button at the top of the page, then click on ‘publishing tools’
Step Two: Extract Leads
From ‘publishing tools’ scroll down to the ‘forms library’, there you would see all the forms created under that page and you would be able to extract the leads on each form in several formats, one of which is an excel sheet.
After extracting, you can then go ahead to upload the leads to your email marketing service account and send them automated emails .
